
Zone play in roller derby is fast becoming an important part of the sport — we’re using it during starts, to escape offense, and to play effectively through some of the weirder scrum situations that appear during the course of the game.
In short, it’s a pretty great piece of this great puzzle we call roller derby. There’s just one problem: how the heck do you train it?
Let’s start with static plays. These are traditional derby plays (back/front starts, offensive assists, defensive rebuffs): You have a plan, and you execute that plan. For example: your plan is to set up a tripod and offense along the back line with the goal of trapping the opposing jammer in the back, and you attempt to do it no matter how the opposing team responds.
In contrast, zone play (also known as “dynamic” or “transitional” play) is a technique to continue actively blocking together even if you’re not set up for a static play. When you’re in zone, each member of your team is responsible for covering certain lanes (horizontal areas on track) and verts (vertical areas on the track), with the end goal of performing a static play.
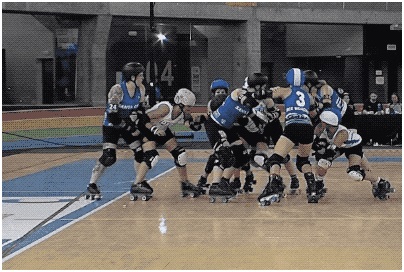
Zone play is most effective when you want to execute a static play, but you can’t (or don’t want to) currently set it up. To use the same start example from above: your white team sets up in a tripod at the back line, but the opposing blue team moves to start inside your wall.
The opposing team is now trusting in their zone technique by playing apart — you lose the ability to tell who’s playing offense on your wall, where they want their jammer to go, and where they’re trying to trap your jammer.

It’s important to note that in this scenario, the blue team must have a plan on how they want to get out of zoning. You can’t just be successful by disrupting the opponent’s start — you need to know how you’re going to use zone to execute your end play and help your jammer.
And, of course, the white team with the back wall can decide at the last second to go into zone play, as well.
When you master zone concepts, it gives you and your team more options to fluidly work around opponents during starts and throughout the game. You can hide your intentions from opponents, throw off their confidence, and most importantly — deal with the chaos of an unpredictable start or offensive move mid-game.
The Three Core Concepts of Zoning
There are three parts to playing zone effectively:
- Smart communication
Clear, concise, helpful comms that detail WHERE you and your teammates are, WHAT you need to do, and WHEN you’re going to do it.
- Playing together while you’re apart
Having a plan before and after zone play, as well as during zone play (knowing who covers what lane and how you’re getting out of it).
- Relishing chaos instead of fearing it
Confidence, planning, and practicing chaos, so that you can execute your strategies no matter what the opposite team does or how your starting formation gets broken.
To learn how to play in zone effectively, I recommend starting with drills that train each of these core concepts individually. While you can certainly try to train zone by asking players to just play apart in chaos, they’ll be much more successful if they train zone’s component parts first.
Some Vocabulary for Training and Playing in Zone
A transitional, dynamic, or zone play: These words are used interchangeably; they refer to an intermediate play you use to connect multiple static plays together. In zone, players are often physically apart from each other or not in a set formation. While players may have set movements and formations in mind for before and after zone play, using “zone” is unpredictable and relies on teammate communication and adaptive lane coverage.
Static play: A set play, usually involving planned movement and formation-based blocking or offense. Though they often end up this way, static plays do not require that players be touching each other. (Team offense, for instance, doesn’t usually involve blockers linked together.)
Comms: Communication (both calls and responses) while executing static or dynamic plays.
Lanes: Horizontal (1/2/3/4) ways of dividing the track space. Also known as “inside/middle/out.”

Verts: vertical ways of dividing the track space. Often known as “top/mid/back” or “A/B/C.”
Hold/Holding: Taking lane space on the track away from an opposing player. “I’m holding inside” = you have the inside line, and your friends can worry about covering the other areas of the track.
Guide/guiding: Holding certain lanes to trick an opposing player into taking a less-desirable path (usually into a teammate holding the opposite lanes, but can also set up traps). “Guiding outside” = you are holding the middle lanes and intentionally leaving the outside lane open for the jammer to take — and you’re letting your buddies know where she’s going so they can trap her there.

Catches/catching: Teammates lining up in “open” lanes to receive a guide. “Catching outside” = You’re receiving your friend’s guide to the outside by holding the outside lane.
Traps/trapping: Intentional plays that bait an opposing player to take a lane. “Trapping lane 4” = Your tripod positions their outside butt in lane 3 with their back to lane 4 to make it look appealing for a jammer; once the jammer commits to that lane, outside butt quickly readjusts to catch and contain.
Drills for Zone Concept #1: Smart Communication
Communication on track should be both call and response: It’s not just one person dictating where the jammer is. To play zone effectively, the whole wall needs to be able to carry on a back-and-forth conversation.
I’m not going to lie: This is hard. But dedicating time to training your comms makes them easier, and talking calmly in a conversation with each other ultimately gives you more control on the track.
First: What should you talk about during a jam?
- Where is everyone? “I’m holding 1.” “Sounds good, I’m holding mid, you two take 1 and 3 in back.”
- Where do you want to set up? “Let’s set tripod in back.” “Got it.”
- Where do you want to end up? “I’m in back and guiding jammer to mid out, set up there!” “Catching mid out.”
- What are you setting up? “Offense is coming, switch to zone! I’ve got inside middle.” “Holding outside!”
- When or what are you doing to the jammer? “Get ready… contain on the jammer in 3, 2, now.” “Got!” // “Tracking back and out.” “Got it, opening out for you.” Insert your strategy or plan here.
- Where are you taking the jammer? “Moving jammer in, open up.” “Opening up in, got it.” (Note: Try to talk about where you’re actively guiding the jammer, even if you don’t have full control— try to avoid the reactive sort of “She’s in 1! outside! middle!” comms, because they easily escalate into panic and chaos.)
- Is offense coming? “We’re good, wait.” “Waiting!” “Offense inside!” “Covering.”
- Is the jammer being squirrely and trying to juke the wall? “You still got, she’s still middle, settle, contain.” “Thanks, still got.”
- Do you need more or less from your friends? “Brace, need more room, move back.” “Got it!” // “Do you need anything?” “Nope, still good.”
- Do you need to move anywhere? “We’re still in play, got five feet.” “Roger, let’s get them out.”
- What play are you executing? If your opponent is in the inside and you want to bring them to the middle, talk through how you’re going to do it. (You might say “But this gives the opponent our plan!” Let me tell you, friend: If someone in the wall is saying calmly to their friends “great, you just need to move up a little bit more and we’re going to drop her inside,” it’s much more unnerving than anything else.) If you’re really worried about this, just use code words. “How are you feeling about banana 4?” / “Not in position, let’s go for apple 1.”
Comms Drill #1: OK!
- Who: Groups of two players.
- What: Butt/brace offset formation. Once drill begins, players must constantly talk to each other while moving forward, backward, or laterally around the track. Each communication MUST have a response.
- Time: 45 seconds each, switch the brace.
Examples: Players should be constantly moving and providing questions/answers from both people. “Contain!” “OK!” // “Are you good?” “Yes!” // “Move to 3!” “Moving to 3!” // “ I need to be closer to you!” “OK!”
Comms Drill #2: 20 Questions
- Who: Groups of two players.
- What: Butt/brace offset formation. Same as previous drill, but now, players can only ask questions of each other. (Players do not have to answer a question with a question.)
- Time: 45 seconds each, switch the brace.
Examples: “Are you still good?” “Yes, still good! Holding in 2!” // “Can you move closer?” “Sure, moving up” // “Can you hold lane one?” “Holding one!” // “Can you switch arms?” “Done”
Comms Drill #3: OK! w/ Jammer
- Who: Groups of three players: two blockers, one jammer.
- What: Butt/brace offset formation with jammer beginning on the formation. Jammers are at 100% skills, 50% speed. Players must constantly talk to each other while trying to block jammer. Each communication MUST have a response.
- Time: 45 seconds each, switch the brace.
Drills for Zone Concept #2: Playing Together While Apart
Great comms will help you know where your friends are on the track, but in order to work together while you’re apart you’ll need to train those footwork and movement skills.
To play together while you’re apart, it’s important to recognize just what you can do by yourself. Some people can block 1v1 across an entire track, but it may put them off-balance or otherwise at a disadvantage. Instead, I like to focus on the 1–1–1 rule: You can effectively contain someone in your current lane and to one lane at either side. (This goes for vert space, too.) So if you’re in lane 2, you could also effectively cover lanes 1 or 3 — but lane 4 would require overreaching.
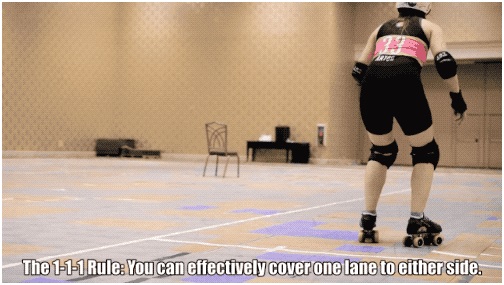
Try to cover someone 2+ lanes over, and you’re going to throw yourself — and likely your buddies — out of position.
As such, if you’re playing apart, avoid overreaching by setting traps and limiting lane space until you can reconnect with your friends. You can do that through guiding: This is where a player blocks the opposition positionally to limit them to certain lane(s). It’s far less exhausting, but relies heavily that your teammates be set up to catch.
Positional guiding can have body contact or (if you can’t get body contact) involves maintaining speed while closing lanes off to the opposition. Body contact while guiding always involves the player’s hips behind the opposition and shoulders/legs in front; this prevents the opposition from easily detaching and taking the less favorable side.
For example: You run a jammer back on the outside line, but your friends have to stay 15 feet up to keep the pack. Rather than 1v1 block them yourself and likely lose them, you set in the middle, letting them jump back in on the outside line, and maintain speed with them by lightly positionally blocking them to lanes 3 and 4. Your friends set up in 3/4 to catch the jammer, at which point you reform into a tripod.
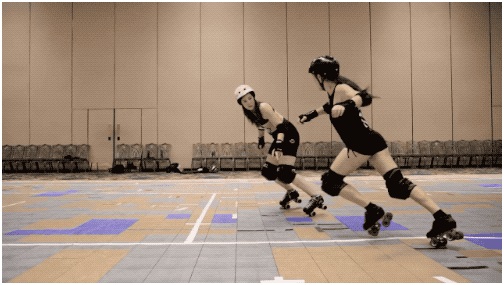
Want an idea of how to do the Team Zone drills listed below? Lana and I demo them in our video from Rollercon, above.
Team Zone Drill #1: The Reverse Mirror
- Who: Groups of two players: one facing forwards, one backwards, no blocking link.
- What: On the whistle, players must constantly move — but in doing so, cover the entirety of the track using the 1–1–1 rule (Example: If player A is in 1, player B is in 3; if player B is in 2, A is in 4; if player A is in 2; player B can be in 3). Players can communicate to each other to move around. “Leaving 1, moving to 2” “Got it, moving to 4”
- Time: 1 minute each, switch who’s facing backward.
Team Zone Drill #2: The Reverse Mirror with Vert
- Who: Groups of two players: one facing forwards, one backwards, no blocking link.
- What: Similar drill to #1, but add moving vertically. “Collapse together in 2/3” “OK” // “Staying in 1, moving top.” “Okay, holding mid and 3.”
- Time: 1 minute each, switch who’s facing backward.

Team Zone Drill #3: Guiding
- Who: Groups of two players: one blocker type, one jammer type.
- What: Drill starts on the inside or outside line; blockers practice trapping re-entering jammers in lanes 1 or 4 by positional and speed-based guiding for up to 20 feet, then reset the drill. This can be done with jammers either at full or partial speed.
- Time: 1 minute each (players reset within that 1 minute on their own).
Team Zone Drill #4: Feed the Birds
- Who: Groups of three players: two blockers type, one jammer type.
- What: Blocker #1 starts the drill 10 feet forward; Blocker #2 is 10 feet back on the inside or outside line, with the jammer beginning out of bounds. Rear player guides jammer to their friend; front player adjusts their lane position according to rear blocker’s guide. When the two blockers meet, they’ll form a two-wall and block for 3–5 seconds; after that point, the least involved person leaves formation to run up 10 feet (i.e. “making the pack” or “playing offense”; new rearmost person guides up.
- Time: 2 minutes each, everyone blocks/jams (if jammer passes blockers, players can reset the drill on their own).
Drills for Zone Concept #3: Chaos
How do you get comfortable with playing in chaos? Simply put: you simulate increasing variations of scattered pack play. Practicing chaos is messy, and it should be. These drills should feel as much like the frustration of a crazy jam as possible (without risk of injury). You’re training your brain to communicate in this situation, and your body to continue guiding and holding lanes despite chaos all around.
Chaos Drill #1: The Gravity Well
- Who: Groups of four players: four blocker types.
- What: Blockers must begin the drill in different lanes and verts. (i.e. Blocker #1 in top, lane 1; #2 in mid, lane 2; #3 in back, lane 3; #4 in mid, lane 4.) On the whistle, players must communicate to form a formation in top, mid, or back, along with who is taking what position (brace, inside, outside, floater, etc). On two whistles, the formation must scatter back into different lanes and verts.
- Time: 1 minute on with coach blowing whistle at intervals, 20 seconds rest, x3.
Chaos Drill #2: Gravity Well + Asteroids
- Who: Groups of eight players: four blocker types + four laterally-moving obstacles.
- What: As with Gravity Well, blockers must begin the drill in different lanes and verts. (i.e. #1 in top, lane 1; #2 in mid, lane 2; #3 in back, lane 3; #4 in mid, lane 4.) There are now also four obstacles, who are scattered in different lanes and verts. On the whistle, players must communicate to form a formation in top, mid, or back, along with who is taking what position (brace, inside, outside, floater, etc). Obstacles are allowed to move laterally in their current vert to attempt to prevent this, but may not step out of their vert (top/mid/back). On two whistles, the formation must scatter back into different lanes and verts, and obstacles freeze.
- Time: 1 minute on with coach blowing whistle at intervals, 20 seconds rest, x3.
Chaos Drill #3: Gravity Well + Asteroids + Jammer
- Who: Groups of nine players: four blocker types + four laterally-moving obstacles + one jammer.
- What: Same drill as above, but a jammer is now starting 30 feet back. On the whistle, jammer goes; when the jammer hits the 10 foot mark, blockers must decide where they’d like to place the formation. They can then block up to twenty feet beyond the top-most obstacle. Obstacles have the same restrictions as above — they may only move laterally in their vert; once the wall passes their vert, they freeze. If jammer escapes, wall must scatter, and jammer comes around the track for another pass.
- Time: 2 minutes on, 1 minute rest, x3 with new jammers/blockers/obstacles for each rep.
